
Results 1 to 10 of 25
-

 Tsikoteer

- Join Date
- Jul 2007
- Posts
- 1,245
June 28th, 2010 12:59 AM #1DIY : Innova Aircon Duct Cleaning / Dashboard Removal
Dust and dirt accumulate inside the air ducts. Moisture from the a/c
operation makes it an excellent medium for bacteria and fungus growth.
Regular cleaning at least once a year will minimize growth of disease
carrying organisms. But you can clean the air ducts , you need to remove the dashboard.
To my fellow Innova owners, below is the step by step procedure in removing the dashboard of our beloved Innova.
WARNING : This is procedure is very tedious and timeconsuming.It can cause some injuries if not done carefully.
DO THIS AT YOUR OWN RISK.
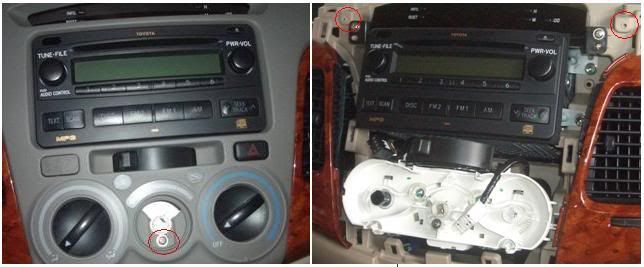
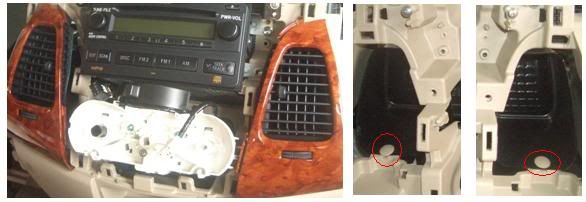
1. Remove the aircon switches on the center console. Remove screw on the middle switch. Pull-out the center console/panel. You need not remove the stereo and MID. Remove 2 screws holding the dash. Screws are encircled in the photos.
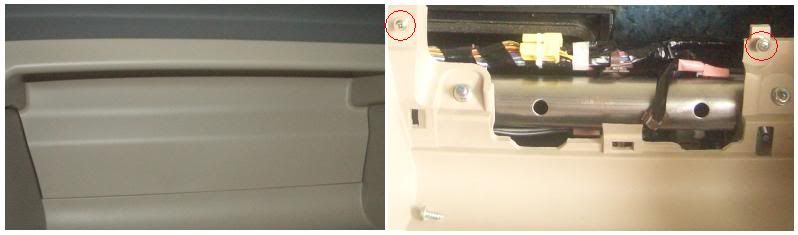
2. Open the upper glove compartment. Remove the cover as shown. 2 screws that holds the dash need to be removed.
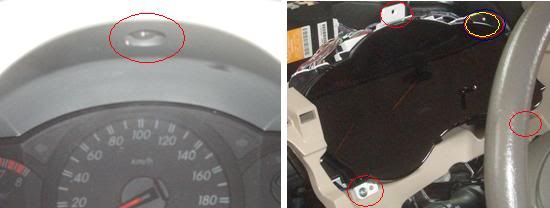
3. This is a step bit tricky and challenging. Tilt the steering wheel
downward. Remove the screw on the optitron meter cover panel. Slightly pull-out the panel. You cannot remove the panel completely but you should be ableto remove the 3 screws that hold the meter.There's another screw behind the meter. You need to tilt the meter inside to be able to remove that screw. You may need to remove the steering column plastic cover ( DO NOT REMOVE the steering wheel , Be careful not to engage the air bag as this might cause injuries ).
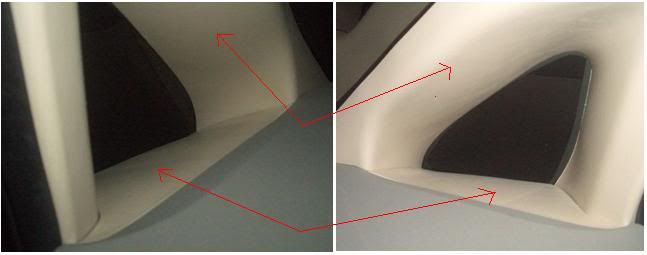
4. Remove the side panels as shown.
5. All the screws that hold the dash should have been removed by now. Dashboard now only being held by clips. Pull-up the dash starting from the center console then on both sides. You may now pull-out the dash.Pls. have someone assist you in bringing out the dash.
6. The 2 center console vents needs to be removed. These 2 air vents are held only by clips.just pull it out carefully. Remove the clips on the vents as shown.
There you go.Time to clean. I'll leave it to you the cleaning method. Vacuum cleaner will be needed as well as a lot of rags/towels. BTW , I permanently closed the air in-let/vent coming from outside. I do not use it anyway.This will also prevent dust from entering the cabin.
Another big task is returning the dash back.
Hope this procedure helps.
-
 Tsikot Member Rank 2
- Join Date
- Aug 2006
- Posts
- 2,320
June 28th, 2010 09:49 AM #2Many thanks to you Ginnova, it would be a tremendous job but like you mentioned it is worth the effort.

Just like to add that it would be safe to remove first the battery terminal before dismantling the dashboard.
-
Tsikoteer
- Join Date
- Jul 2007
- Posts
- 1,245
-
Tsikoteer
- Join Date
- Jul 2011
- Posts
- 584
July 4th, 2011 10:00 AM #4salamat nga pala sir muntik ko ng makalimutan reply dito Originally Posted by Ginnova

-
Verified Tsikot Member
- Join Date
- Jul 2011
- Posts
- 16
July 28th, 2011 01:11 AM #5Sir ask ko lang kung may air filter ang innova E 2006 model? I removed the upper/lower glove compartment pero wala ako nakitang filter cover parang naka fix tas kinapa ko sa taas wala ako nakapang filter.. Thanks!
-
 Verified Tsikot Member
- Join Date
- Aug 2009
- Posts
- 150
July 28th, 2011 01:06 PM #6Mine is 2011 model but I think pareho lang location ng filter for aircon. After removing lower compartment, may makikita kang rectangular na cover at the left side. Naka clip lang un. Look for the clip which locks the cover in place. Push the clip and pull the cover. You can see the filter inside.
-
Verified Tsikot Member
- Join Date
- Aug 2009
- Posts
- 150
July 28th, 2011 01:16 PM #7Ginnova, how can I access the air inlet, the easiest way? Kahit kasi na close yung vent , may pumapasok pa din na amoy from outside. I test it using an air freshner and spray it outside a little below the rightside wiper. Umamoy!. Kaya pala tuwing daraan kami sa tabi ng basura, may pumapasok na amoy.
-
Tsikoteer
- Join Date
- Jul 2007
- Posts
- 1,245
July 28th, 2011 07:01 PM #8The easiest way to close the aircon outside vent is thru the plastic cover near the wiper. remove wiper arms then remove the plastic garnish covering it. sa may passenger side nandun yung vent. you can now cover it the way you want. this is easier than removing the dashboard.
-
Verified Tsikot Member
- Join Date
- Aug 2009
- Posts
- 150
-
Verified Tsikot Member
- Join Date
- Jul 2011
- Posts
- 16
July 28th, 2011 10:23 PM #10Thanks for the reply sir pero mukhang wala talaga ang innova E 2006 model .... Originally Posted by joey roo

 Reply With Quote


oo nga naman! aftersales. piyezas. i read of horror stories of languishing waits for...
BYD Sealion 6 DM-i