


accumulated enough scratches to deter and defer detailing prompting a first try at diy refinishing.
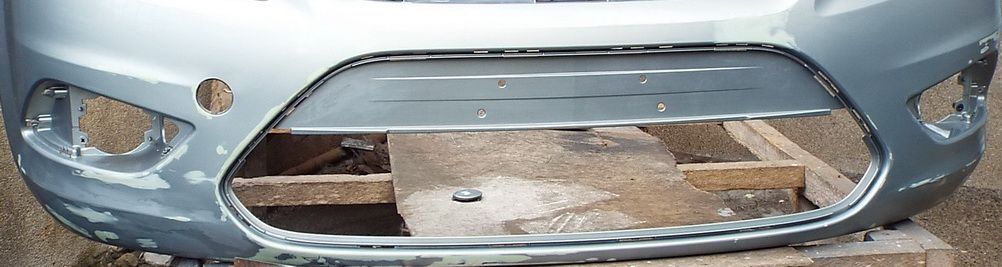
before
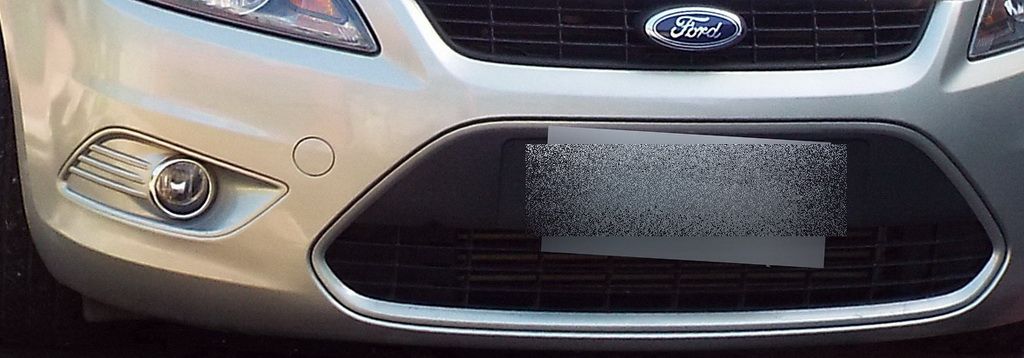
after
it took 3 reps til i called it quits.
left sanding marks, bruising, and orange peel all because of buying less paint than needed. noob
next time i'll surely do better. at 700 Php total.
happy new year
The Largest Car Forum in the Philippines
- Forums
- Discussions
- Events
- Community
Results 1 to 11 of 11
Hybrid View
-

 Tsikoteer

- Join Date
- Oct 2008
- Posts
- 592
December 31st, 2013 06:48 PM #1
-
Verified Tsikot Member
- Join Date
- Jul 2009
- Posts
- 153
January 2nd, 2014 10:15 AM #2Malamang low resolution ginamit nyo na camera, hehe, joke lang boss! Good job, sa picture parang brand new! Ang galing nyo din magtanggal ng mga clip. I wish kaya ko din gawin mag DIY ng repainting!
-
Tsikoteer
- Join Date
- Oct 2008
- Posts
- 592
January 2nd, 2014 11:13 AM #3salamant naman. sa susunod baka mas malinaw na ang camera ko. kita naman ang sanding marks. ang orange peel naman kita na dahil di nga sya nag-wet look. kulang kulang pa kasi ang gamit ko. maghahanda na ng maigi sa susunod. ang importante ay kaya natin to.
tama ka dyan. anim na parte pa ang kakalasin pagkatapos kalasin ang bumper. masakit sa daliri pero alam na yan dahil sa mga street fighter tsaka tekken tournaments ng magbabarkada noon. kailangan talaga ng tyaga at tamang kagamitan para sa mga clips at iba't ibang turnilyo na kung saan saan nakasuot. kailangan din ng upuan na tamang taas at mababa, tsaka higaan kapag sumisilong. nawalan ako ng isang clip.
-
Tsikoteer

- Join Date
- Oct 2009
- Posts
- 2,271
January 8th, 2014 06:03 PM #4yan din gusto ko matutunan kung paano ko sisimulan
baka pwedeng paki step by step ang procedures..
kasi ginagagawa ko after ng masilya.
nilalagyan ko ng patty ba tawag dun ung kulay green para mas makinis after ng masilya..
tapos ung primer..
tapos pintura,mga 3 coating
ung susunod ba eh top coat na ung clear,
nalilito kasi ako..after ng pintura..at matuyo na,kailangan paba pasadahan ng sand paper na pino.bago bugahan ng clear coat,
after ng mabugahan ng clear cout ,kailangan paba lihahin ulit ng pino..saka i rubbing..
nalilito kasi ako.kung pagkatapos ba ng pintura,,sunod na agad ung top coat ,
or pintura muna tapos lihahin ng pino.saka bubugahan ng top coat..
help naman TS kung ano taman gprocedure sa repainting..
-
Tsikoteer
- Join Date
- Oct 2008
- Posts
- 592
January 9th, 2014 06:51 AM #5steps
hugas pag may dumi, joy bago magpintura
liha ng damage
putty o masilya pareho ang 2
block sand
primer
pwede mag wet sand 400-800
base coat
pwede mag wet sand 1500-2000 pero kapag hindi patas na parang DA sander, kita ang sanding marks pagkatapos mag clearcoat/topcoat, iwasan na lang
clear coat na. dito dapat diretso ng makintab ang panel.
pwede mag wet sand 2000 at polish.
pinaka importante ay ang pagsuot ng kapote para di madapuan ng pintura sa pag spray o liha. kailangan ng gloves, full face mask tsaka gas mask.
kailangan din na nakahanda at kumpleto ang lahat ng gamit. baguhan tayo kaya mas mainam na ang mga produktong bibilhin ay may malinaw na instructions sa dry, cure, coating, recoating, sanding, at polishing time, needle size, air pressure, etc. step by step binabasa kong muli kada susunod na produkto. ito ang unang dapat sundin. depende lahat sa produktong gagamitin ang diskarte. mas magastos kapag mag-eksperimento. sunod lang at di naman ito lalampas ng 2500 Php kada panel
siguruhin na malinis ang paligid. basain ang lugar para iwas alikabok.
bugahan ng hangin ang panel upang makita kung maalikabok o may mga bagay na lilipad, at para siguruhin na maayos ang pagkakatayo/lagay ng panel at di ito matutumba o mahuhulog.
bago mag spray sa panel sa praktis board muna tingnan kung maayos ang labas. dito mag adjust ng spray gun. i-adjust din ang max pressure sa moisture trap.
magtulungan tayo. kaya natin to.Last edited by indiej; January 9th, 2014 at 07:01 AM. Reason: ispeling
-
Tsikoteer
- Join Date
- Oct 2008
- Posts
- 592
May 8th, 2014 07:18 PM #62nd attempt notes:
gentle with the rubber trims, do not flex > 20%
rinse thoroughly with water after washing.
guide coat block sand til kingdom come. more hardener on putty rather than less. apply w/ a little bulk and just sand down. spray thinly & check every coat for solvent pop. use glazing putty, this more of a liquid than paste to finish body filling. check shrinkage after 3 days and resand w/ guide coat.
work with clean caps and nozzles. clean immediately. coat inside base flash time at 15 minutes. short pot life esp. at the cap. will sputter or fan width decreases dramatically
don't spray during the rain or immediately after, humidity rises around 90+%. 70+% in the summer heat. the spray passes through the humid air and clear can lay down milky/cloudy. it still cures clear though, don't get a heart attack. if it does not after 6 hours, start to worry.
buy retarder. practice spraying clear w/ retarder, not on the car. 3 coats, spray thin and wet. for 6-4" fan width, do by panel. use reflection to check spray wetness.
more notes: 800 wet then 1500 wet for clear, no sand marks, dry clear spray marks. clear whole panels
first night out of the car, saw a Honda City with butt matched rear quarter panel, all other things looked great. glad i'm not limited to blend on other panels.Last edited by indiej; May 8th, 2014 at 07:22 PM.

 Reply With Quote